Posts mit dem Label Objects werden angezeigt. Alle Posts anzeigen

Dienstag, 31. Januar 2017

Furious dice bag


A friend of mine started a new Youtube channel(-> here) about his pen-and-paper RPG endeavours. In fact, he already has such a channel (-> here), but the new one if in english for a broader reach.

Anyway, I like when people do something other than sit in front of Facebook, so I made him a gift:

A leather dice bag, made with the laser cutter in the MunichMakerLab!
The first leather dice bag I made... and it kinda sucks! :-D

I wanted to engrave his new logo, sadly I didn't watch the paths and didn't realise that the thick black areas were lots of paths side by side. So the laser penetrated not just engraved. Well it still holds together but I don't know how long
Second, the rope doesn't glide. I sew a narrow strip of leather together and wanted to turn it out... didn't work, to narrow. I had no alternative, so I put it in like that.

With all that I forgot to make nice endings for the rope, so I set four stitches by hand to just fold it over.


Meh, could be worse. Next one will be better!

Sonntag, 18. September 2016

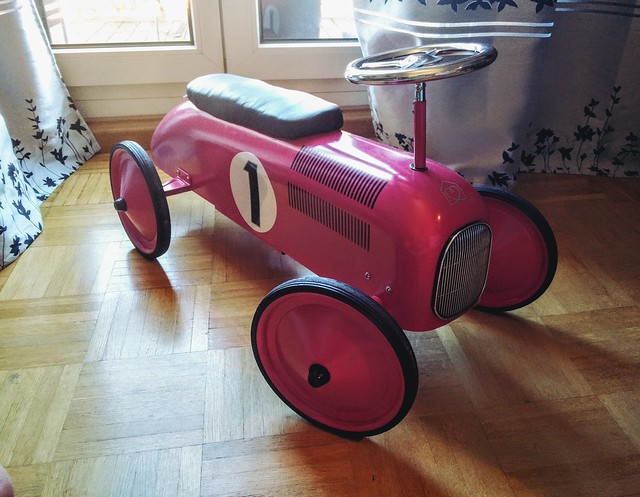
Thats not pink!


A friend gave me an old pink magenta pedal car for my son, as thank you for helping them move. 
It's made out of sheet metal any already survived his two son more or less unscratched.

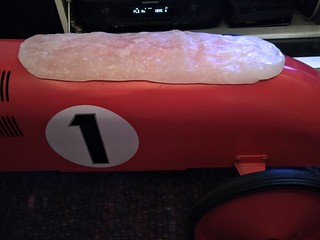
The only (major) thing that's not made out of metal is the seat (you can see the original here), so I decided to change build a leather seat.

I used fantastic plastic as a base material, found some foam at the makerspace and used some furniture leather I had sitting around as cover. I made it a twin seat because, you never know If you need some additional room. =)  

Dienstag, 22. Dezember 2015

Wooden TIEfighter


I toyed around with 123D Make and produced this from a TIEfighter 3d model in a few minutes. Very cool program!

Here on thingiverse...

Dienstag, 15. Dezember 2015

Leather Macbook sleeve


Some more ventures into laser cutting leather. I needed a step up from the laser cut mobile phone sleeve, so I went to notebooks.


I used furniture grad leather I bought from a local BO Concept store. I used white on front and back, brown on the sides.


First try to use a new tool for the stitching as well. I used something like this. I need some additional practice though...

Sonntag, 13. Dezember 2015

Braunbox


I stumbled upon the Tombox, a company that refurbishes old 60 and 70ties loudspeakers, insert an amp and battery and sell them as a mobile sound system. I liked it very much and so I copied them.

I started out with an Braun L450 because I liked the shape, metal mesh front and the thinness (just over 10cm). I inserted an Kemo 18W amp module, 10k poti with switch a a 2.2A lead-acid gel battery. Feet and a handle was next. With that I was feature equivalent to the Tombox.

Then I inserted another one of the Bluetooth audio modules as used in my up-cycled headphones. Now its better. ;-)

To be fair, I did not touch the 40+ years old frequency dividers and the bluetooth module does not really play nice with the amp (some distortions, should be fixable). And its quite heavy, curtsy first to the wooden enclosure and second to the lead-acid battery. But I really like the result.


Sonntag, 23. August 2015

First experiment in lasercutting leather


Another MuMaLab member demonstrated to me how easy it is to laser cut leather. I love leather as a material and wanted to try it myself.

This is my first try, a protective mobile sleeve made out of a thin, soft leather in blue-green. I designed the pattern in OpenSCAD and made it able to adapt to different phone sizes.


I ordered the material of eBay and made the cut on the Lasercutter in the MuMaLab.


The trick is to cut the holes with the cutter as well. That way, you don't need a sewing machine (or the skill to use it) just a needle and some time. I took about 30 minutes to sew the parts together.


You can find the file on Thingiverse. Or if you want to replicate my effort, go to Instructables.


Sonntag, 28. Juni 2015

Dienstag, 2. Juni 2015

Don't park here


The janitor at the MuMaLab is a real nice guy. He's helping us all the time. So when he asked me for two shields to put in front of his parking lot, I put some effort into it.

It's lasered into yellow acrylic and mounted with some spacers over an aluminium plate. The acrylic glows when illuminated by UV light, looks awesome in sunshine. At night the aluminium reflects the headlights.


Freitag, 29. Mai 2015

More space


After thinking about it for three years, we finally got around to install a wall mounted shelf in the living room. It's a Vitsœ 606 and I love how configurable and easy to install it is.

I configured it myself, but the interior designer at the Vitsœ shop had lot of helpful suggestions. I suggest to everyone not to take their offer to set up the shelf for you, because you will miss out on the joy of experiencing good design firsthand. It was really fun building this.

Montag, 20. April 2015

Wooden staircase.


If that seems familiar, then have a look at the last post on this blog. ;-)

We got the laser cutter in the Munich Maker Lab to work and I tried large scale engraving for the first time.

Its MDF, about 45x30cm and took 80 minutes to engrave and cut.

Samstag, 10. Januar 2015

Triplet ceiling lamp


A lamp made out of three Hella fog lamps ('Hella 1NL 008 090-821' to be exact).

The lamps are mounted upside down and are adjusted to light the ceiling but not the wall. They are nearly parallel to the ground but still only light the upper part. So you can see the exit point of the light but it doesn't dazzle.

The 12V transformator is contained in an Ikea Blanda Blank metal bowl - perfect fit.

A learning: Do not use speaker cable for anything that gets hot! I had this mounted 3 month ago, but the isolation of the speaker cabling melted and shorted. Thankfully I was in the room and could switch it of before everything went to hell.

Downsides: Gets horribly hot, draws just under 300W, really expensive (around 150€ in parts)


Samstag, 27. Dezember 2014

Up-cycling headphones

I needed new bluetooth headphones as my old Nokias started to fall apart. 


Seeing old analog wireless headphones in the free-for-all bin in the Munich Maker Lab I looked around for a easy solution to enable them with bluetooth. 

I found the OVC3860 module (5$) which integrates an bluetooth module with HiFi and headset profiles, an headphone amp, lipo loader and even has some pins for easily attachable buttons. 

I've put the module in one side and an old 370mAh lipo with an separate charger in the other. 


Features added: 
- 3 buttons on the side to control Play/Pause, Next, Previous
- NFC sticker to setup up the bluetooth connection 
- Audio port usable as a line out (with volume turn low) or speaker in (with audio module off)


Total cost of the project: around 10€

Donnerstag, 25. Dezember 2014

New insights in my mobile

I have a Sony Xperia Z which I was very happy with until recently.


First, an Firmware update destroyed the battery runtime, then another one fixed this, but the phone was laggy as hell THEN the lens permanently fogged up from the inside with dust (this phone is waterproof, how did that happen??).

I was close to buy the new MotoX, but decided to follow the Self-Repair Manifesto and 'own' this phone. First I installed Cyanogen Mod to make it fast and stable again, then I fixed the lens fogging. I had concerns about that as everything is glued together but it was really easy. You only need a hot air gun and a suction cup.

Anyway, I tried how easy it is to remove the black coating of the back glass... you see the result below. =)


The mainboard was covered by the NFC antenna, so I moved that over the battery.


Mittwoch, 27. August 2014

Light bowls


The small central corridor of our flat is lit by an old IKEA cable track light with three spots. We got it with the flat and I kinda liked it, but as I stumbled upon shiny white bowls with inner golden coating its day were numbered.

Goodbye, boring lights.
I used the cable track and the original mounts to attach the bowl, which in turn got an 1157 car light socket installed. I wanted to install LED lights and therefore put an rectifier on top to convert the AC from the IKEA transformator to (100Hz pulsed) DC. I used rectifiers about 50x to big which enabled me to use the AC input wires as mounting points (~1mm thick) to hang the lamp from.

One LED is already dead...
The cheap 'warm' LED lights I bought produce a strange ghostly light. Not perfect. And the 100Hz kinda show, maybe I will put some caps on there.

But they look nice in the corridor, I will try to get other lamps to improve the light temperature.


Samstag, 16. August 2014

Un-crap tripod


My girl bought me a Manfrotto 785B over 8 years ago. I liked it because its really light but was stable enough to mount my Panasonic FZ-8 and later my E-P1. That said, it was still ok to use with the E-M5 but I used it a lot with that camera and this showed at the head which couldn't be fixed down properly anymore. 

Original
Being one of the cheaper Manfrotto tripods the head is not swappable, only replaceable with the same one. Nevertheless I wanted to upgrade to a better head and found the Manfrotto 494RC2 with mounting plate which is easily big enough to hold my E-M1 with 50-200 SWD (~2kg). 

Modded
I removed the old head and used Plaast (hand-formable thermoplast like Fantastic Plastic) to form an end cap to protect the old thread. After it hardened it was easily unscrewable, so I can mount the old head again.   

Then I turned the lower part of the center post around, unscrewed the original end cap, wrapped an 3/8 inch screw in Plaast and slowly screwed the still soft material in the thread. I fixed the screw down while the stuff was hardening and was already done.

A bit of way on the center post was lost, everything else is great. =)


Married life


Sorry for the lack of updates. I married my kick-ass wife and had not much time to do anything.

Here is a photo of our wedding rings made for us by Karl Pfefferle.  He made them in Mokume Gane fashion from Gold and Palladium and we love them.

Mittwoch, 28. Mai 2014

Lovely Lisas Labels


My fiancée is a big knitter and loves handicraft (as evident here and here).

Thats why for her birthday I designed labels for her pieces. They are real woven textile labels like one finds in bought clothes.
The wool strand in the background came from a shoot I did for a cool handicraft shop in Munich and LeaderBrat helped me with the details. They were made by Dortex.


Dienstag, 8. April 2014

Wood, Foam and Tin


As written in my 'About me' I'm not completely subscribing the the geek denominator. But this is going deeply into nerd territory: I made myself a new a new case for my Warhammer 40k miniatures.

My friends and I started playing in the last millenium and it bubbles up again every year for a few weeks. I wanted a new case for some time but the ready made stuff is really expensive (and ugly). I decided to build a case myself and hunted down a wooded keyboard gig case on ebay. Very good quality, aluminum reinforced, lined with felt.

Then I went and bought some foam cut to the millimeter to fit to the case (here) and installed Inkscape to build some vectors for the laser cutter.

The lid is over 5cm deep so I planned to include model storage in there, too. I made a foam coated door out of dibond (plastic/aluminium composite) and hinged it inside the lid. To keep it closed I used a magnet harvested out of an old hard drive (see here).


Finished product:
- 107x36cm outer dimensions
- 6 removable trays
- perforated, configurable foam (for tanks and big stuff)
- lid with glued in grid and own door with magnetic lock (magnets out of hard drive)
- Total cost: around 80€


I now have storage for:
- 140 (lid) + 70 (trays) slots for normal models (5x2.5x3 cm)
- 50 slots for medium models (5.5x4x4 cm)
- 19 slots for large models (7.5x4x4 cm)
- 8 asymmetric slots for walkers (13x4-5.5x4 cm)
- perforated foam (50x34cmx5 cm)


It weighs a ton but as we are playing so little its no big hassle to lug it to the car once in a while. And there is a ton of space left. Should me last a while. =)


Freitag, 10. Januar 2014

Burning concrete


I'm fooling around with concrete and here is my second try. A concrete candle stand.
So useful!

Next up: A lamp. (Did you guess?)